Office yoga sequence

We all know we should stretch every hour while we’re at work, but how many of us actually do it? Every morning, you sit down at your desk with the greatest intention of stretching regularly or at least getting up to move around a bit. Five hours later… you realise that you haven’t moved an inch and you’re hunched over your desk with a sore lower back and stiff shoulders/neck that have knots so hard you’re surprised you can still turn your head. I’m definitely guilty of this!

Here is a short, easy sequence to help stretch out those kinks in your neck and shoulders. The great thing about this sequence is that you can do it at your desk or while waiting for the bus, the kettle to boil or in line at the post shop: these basic stretches come so naturally that you won’t get too many strange looks in public! You also don't need any props, not even a yoga mat.

The trick to remembering this sequence is – forwards, backwards, side-to-side, twist – the six basic movements in yoga.

Forwards, backwards, side-to-side, twist

Forwards, backwards, side-to-side, twist

Short version

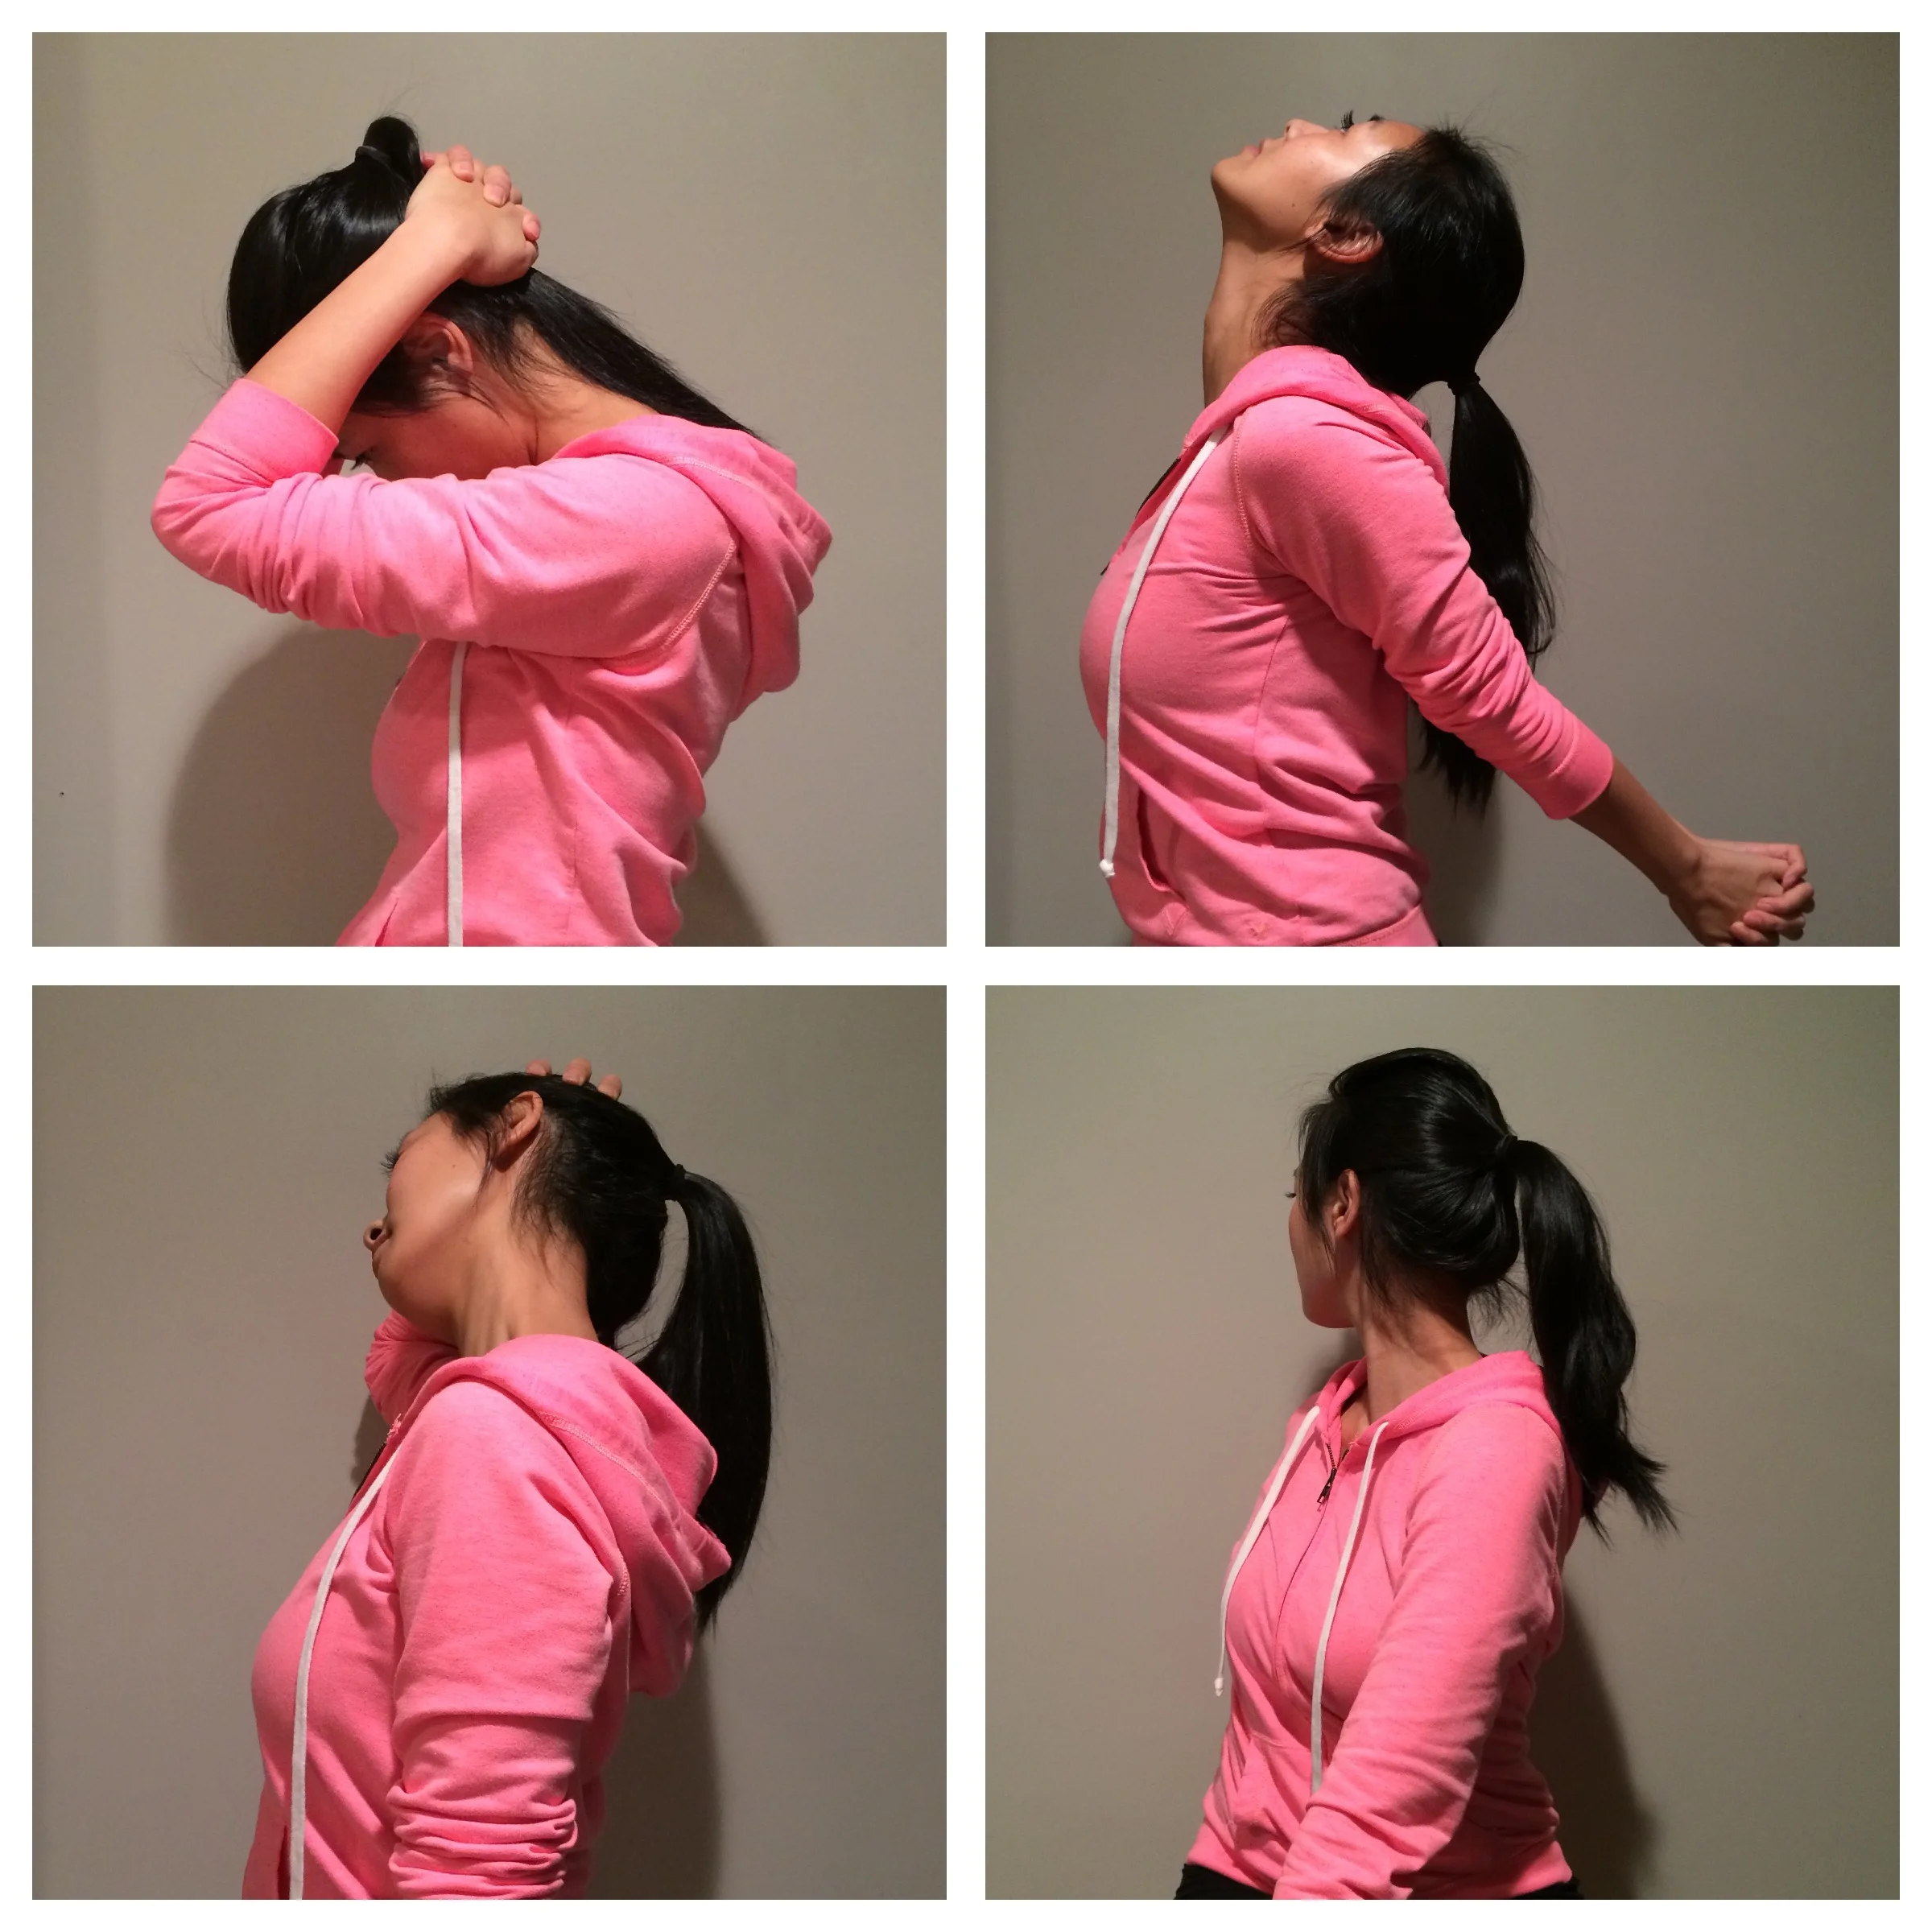
Forwards: Interlace your hands behind your head, with your elbows pointing forward, and slowly stretch out the back of the neck, bringing your chin towards your chest for 5–10 deep breaths.

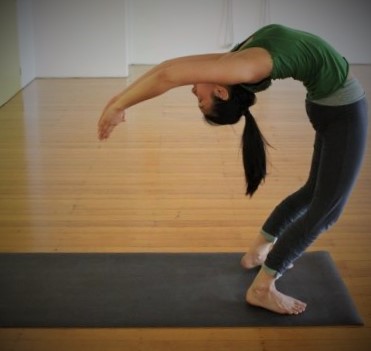
Backwards: Interlace your hands behind your back and press your hands away from your back. Lift your chin up and stay here for 5–10 deep breaths.

Side to side: Catching the left side of your head, gently tilting your head to the right for 5–10 deep breaths. Bring your chin towards your right collarbone, looking at your right shoulder, for another 5 breaths. Release and repeat on the other side.

Twist: Twist to the right, from the base of your spine right up to the top of your neck. Look over your right shoulder for 5–10 deep breaths. Release and repeat on the other side.

Full description

Forward: Interlace your hands behind your head, with your elbows pointing forward. Sit up straight and engage your core muscles (lower abdominal muscles drawing in and up) throughout this sequence. Now let your elbows come forward and down, allowing the weight of your arms to stretch out the back of your neck. Don’t press down just yet – let the tension at the base of your neck slowly melt away. Once you’ve been here for a few deep breaths, if you feel like you want a little more stretch, you can start to press down a little on the back of your head, bringing your chin a little closer to your chest. Let your shoulders relax down away from your ears, and lift your chest upward towards your chin. Stay here for 5–10 deep breaths. Slowly release your hands and bring your head back up.

Back: Now let’s do the opposite and stretch out the front of your neck. Interlace your hands behind your back and, if possible, straighten your arms and press your palms together. Lift your chin up, looking up at the ceiling (if this hurts your neck, ease off a bit and focus on lifting your forehead and chin equally while drawing your shoulders down). Keep opening your chest by slightly squeezing your shoulder blades together and sliding them down the back. Stay here for 5–10 deep breaths. If you’re standing, you can even do a slight backbend by pressing your hips forward with your feet hip-width apart. Slowly bring your chin back down to level and release your hands.

Side-to-side: Now let’s stretch out each side of your neck. Reach your right arm over your head, catch the left side of your head and tilt your head to the right. Keep the rest of your spine straight and long. Actively draw both shoulders down away from your ears. Again, start slowly – you can add more weight once you feel the release on the left side of your neck. Keep breathing deeply, feeling your rib cage stretching out on all sides of your body – front, sides, back, all the way up to your collarbones. Shallow breathing is a very common issue that can exacerbate anxiety and stress, so while you’re paying attention to your body, you may as well stretch out your lungs as well as your muscles. Stay here for 5–10 deep breaths.

Now bring your chin towards your collarbone, looking at your right shoulder for another 5 deep breaths. Lift up from your chest every time you breathe in and actively draw your left shoulder down. Slowly release and repeat on the other side.

Twist: Sit close to the front edge of your chair and sit up tall, imagining your spine getting longer. Keep drawing your shoulders back and down, and twist to the right from the base of your spine all the way up to the top of your neck, slightly squeezing your knees together. Catch the outside of your right knee with your left hand and bring your right hand behind you on your chair. Try to point your right shoulder directly behind you and look over your shoulder. With each inhalation, lengthen your spine; with each exhalation, twist deeper. Stay here for 5–10 deep breathes, then release and repeat on the other side.

Give this sequence a try at work today – let me know how it goes!

The Benefits of Yoga

People often ask me ‘Why corporate yoga’? My answer is simply that it’s a ‘win–win’ for everyone involved. Regular yoga classes show your employees that the company cares about their health and well-being. Other benefits include improved work performance, better relationships between colleagues, a more relaxed work environment and increased productivity. In terms of health, reduce the number of sick days, and stretch out necks, shoulders and backs that are sore from sitting at a desk all day.

Studies have consistently demonstrated the many benefits that yoga offers. Here are some of the advantages of a regular yoga practice:

Reduce:

  • stress and/or anxiety
  • blood pressure
  • blood sugar
  • neck/shoulder/back pain
  • sickness (by boosting immunity)
  • cortisol (stress hormone) levels
  • cartilage and joint breakdown
  • pain from injuries

Improve:

  • flexibility and balance
  • energy levels
  • muscular strength and tone
  • cardiac health and circulation
  • core strength
  • posture
  • bone health (increases bone density)
  • digestive issues (twists are helpful here!)
  • sleep
  • concentration
  • confidence
  • self-awareness
  • sensitivity and patience
  • relationships
  • breathing (becomes less shallow)
  • athletic performance
  • overall health

So what’s the next step if you think that your office may be interested in yoga classes? I’ve found several good ways of gauging interest depending on the size and structure of the company.

  • Talk to the person who handles Health and Wellness for employees and see if there is scope in the company health programme for yoga classes.
  • Send out a group email to everyone in your office with a link to this website to see if they’re interested.
  • Ask the social club to organise classes as a social event.

Studies have also shown that long-term, consistent practice can make you happier! As I said, it’s a win–win for everyone.

Yoga for back pain

The lifestyle of the typical modern day office worker lends itself to back pain. Unfortunately, over my years teaching yoga, I would estimate that at least one in four students has some sort of back problem; globally, back pain is the foremost contributor to disability (Institute for Health Metrics and Evaluation. “2010 Global Burden of Disease Study”).

Marichyasana C. Twist evenly from the base of the spine right up to the top of the neck. Photograph by Gray Gilbert.

Marichyasana C. Twist evenly from the base of the spine right up to the top of the neck. Photograph by Gray Gilbert.

Cultivating awareness and proper posture are crucial for combatting back pain, and luckily, there are things you can do in class to help. Mula bandha and uddiyana bandha should be engaged throughout your entire practice. These bandhas work in unison, increasing the internal pressure around your spinal column, and thus helping to protect your spine from injury.

  • Mula bandha: Draw your pelvic floor upward slightly
  • Uddiyana bandha: Draw your lower abdominal muscles (about 2 inches below the navel) inward and upward

General guidelines for yoga with back pain

  • Forward bends: Bend your knees slightly and try not to round your back forward. Inhale, engage bandhas, then lengthen your spine and lift up from your chest; exhale, tilt forward from your hips.
  • Backbends: In backbends, it’s quite natural for your body to bend more easily in the lower back due to the natural S-curve of the spine. However, especially in those with lower back pain, this can cause compression of the vertebrae (typically L4 or L5) – aim to bend more from your upper back to counteract this and always engage your bandhas before going into a backbend. Inhale, expand your chest; exhale, tuck your tailbone under and lead your sternum in the opposite direction.
  • Twists: Ensure that you keep your spine long and go slowly, twisting evenly from the base of the spine right up to the top of your neck. Engage your bandhas. Inhale, lengthen your spine; exhale, twist.
  • Side bends: Always keep your spine long and move with your breath. As always, bandha up first! Inhale, lengthen your spine; exhale, move into the pose, making sure you are bending uniformly over your entire spine.
Photograph by Jude Hynes.

Photograph by Jude Hynes.

Pay close attention throughout your practice – if it hurts, modify! Don’t be scared to talk to your teacher about any concerns or if you have any questions.

Tip: Engage mula bandha and uddiyana bandha and bend your knees when lifting heavy objects to help protect your back. In fact, if you currently have back pain, it can be beneficial to engage these bandhas throughout the day – I liken it to adding a layer of bubble wrap around your spine – a) it helps to support your spine, preventing further injury, and b) it strengthens your core, which further helps to improve your posture.

In short: awareness + bandhas bandhas bandhas!

My Go-to Muesli Bar Recipe

These high-energy muesli bars are perfect when you’re always on the go. They taste great and are quick and easy to make. Always have a batch in your fridge and a couple in your bag and you’ll be much less likely to reach for that 3pm chocolate bar (guilty face right here!).

Ingredients:

  • 1 pack medjool dates (I use the ‘Natural Delights’ 8 oz pack)
  • 1.5 cups oats
  • 1 cup unsalted almonds
  • 1/4 cup honey
  • 1/4 cup 100% peanut butter

Instructions:

Toast the oats and almonds separately in the oven at 150°C until golden. Meanwhile, heat the honey and peanut butter in a small pot on the stove over low/medium heat until runny. Blitz the dates in the food processor until they form a ball; put them in a large bowl with the toasted oats, roasted almonds, and honey and peanut butter mixture. Mix with your hands until evenly combined, press firmly into a baking dish – I like to line it with cling wrap so that it pops out easier – and put in the fridge for an hour or two. Remove from the baking dish and cut into bars (or bite-sized pieces). These bars keep for a few days in the fridge. I think you could probably freeze them too, but trust me when I say that you won’t need to, as they’ll be gone in no time!

Successful variations…

  • 1 Tbs toasted sesame seeds pressed in on top

  • 2 Tbs dark chocolate buttons mixed in

  • 1 Tbs chia seeds mixed in

  • Decreasing the amount of honey and increasing the peanut butter (about 1/8 cup honey and 3/8 cup peanut butter) so that it is less sweet

  • You can also use normal dates instead of medjool dates – just soak them in boiling water for a few minutes, drain the liquid, and you’re good to go!

Not so successful variations…

  • Maple syrup instead of honey. These fell apart!

  • 1/2 cup peanut butter instead of 1/4 cup peanut butter + 1/4 cup honey. These also fell apart.

Variations that I’m going to try in future…

  • Goji berries

  • Sunflower or pumpkin seeds

  • Dried cranberries (the tart kind, not the super sweet kind)

Posture of the Month: Baddha Konasana

Baddha Konasana (Bound Angle Pose) opens up the hips, which become tight over the years from sitting in chairs or couches, as well as various sports including cycling and running.

Photograph by Jude Hynes.

Photograph by Jude Hynes.

  • Inhale. From a seated position, bring the soles of your feet together, wriggling your feet close to you. With your thumbs on the soles of your feet and your fingers on your insteps, open up your feet like a book. If your knees are up high, you can use your elbows to gently press them down. Keep your back straight and your chest lifting from the sternum. Draw your shoulder blades down the back. Press the little toe sides of your feet together and keep opening up the big toe sides of your feet, keeping your toes relaxed.

  • Exhale. If your knees go right down to the floor, then you can bend forward, leading from the chest and tilting from the hips. Try not to round your back or hunch your shoulders. Take 5–10 deep breathes here.

If you get sore knees in this posture, experiment with bringing your feet further forward (away from you) or placing folded or rolled up towels/blankets under your knees to ease the pressure from your knees.

Tip: Try this posture with your back against the wall to prevent your hips from tilting backwards – come into the posture with your back against the wall; leaning forward slightly (allow your knees to lift if necessary), wriggle backwards until the base of your spine is firmly against the wall and then sit up straight again. Sit up tall and press your shoulders back and down.

Variation: Supta Baddha Konasana

Exhale. Lie down on your back, and with your feet and knees together, bring your feet in close to your hips (feet flat on the mat). Let your knees slowly drop out to the sides, with the soles of your feet together. Relax into the pose. Stay here for 10–20 deep breathes. If you want to stay here longer (e.g. for relaxation), you may want to place some rolled up blankets/towels under your knees. Come out of this posture slowly by bringing your knees together, using your hands to help you if necessary.